How to enable and disable IPv6

IPv6 is the most current Internet Protocol (IP) version, allowing network communication and data transfers.
What is IPv6?
Internet Protocol Version 6 (IPv6) is a network layer protocol that enables network communication and data transfers. IPv6 was created in 1998 with the primary intention of eventually replacing the IPv4 protocol.
IPv6 was designed with security in mind; thus, it is more secure when properly deployed than IPv4. This gives an edge over the previous protocol but is not a replacement for a secure VPN on your device. What IPv6 does provide is more connections.
The previous standard, IPv4, is made up of four number strings, each of which contains three numbers separated by dots. A regular IPv4 address is 32 bits long and looks like 377.377.377.377, allowing for 4.2 billion distinct IP addresses.
With a growing number of wireless and network-attached devices, it was anticipated that by 2010, the internet would have depleted all unique IPv4 addresses. IPv6 was standardized to develop a new network layer protocol standard that allows the creation of more unique IP addresses.
The 128-bit IPv6 protocol consists of eight numbered strings, each having four characters, separated by a colon. This provides us with an incredible number of unique IP addresses. It also ensures we always have unique IP addresses to allocate to new devices.
How to enable or disable IPv6 on Mac?
- Choose the Apple menu, then “System Settings” or “System Preferences,” and then Network from the menu.
- On the left, select the network service you want to utilize using IPv6, then select “Advanced.”
- Select “TCP/IP”.
- Select “Manually” from the “Configure IPv6” drop-down menu, then add the IPv6 address, router address, and prefix you obtained from your network administrator or Internet Service Provider (ISP).
- To save your settings, click “OK”.
To disable IPv6 on Mac, follow these steps:
- Choose the Apple menu, then “System Settings” or “System Preferences,” and then Network from the menu.
- On the left, select the network service you want to utilize using IPv6, then select “Advanced.”
- Select “TCP/IP”.
- Select “Link-local only” from the “Configure IPv6” drop-down menu.
- To save your settings, click “OK”.
How to enable or disable IPv6 on Windows 11?
To enable IPv6 through the Settings app on Windows 11, follow these steps:
- Navigate to the “Settings” menu.
- Select “Network & Internet.”
- Select “Advanced network settings” from the drop-down menu.
- Click the “More network adapter options” under the “Related settings” section.
- Right-click the network adapter and select “Properties.”
- Remove the check mark from the “Internet Protocol Version 6 (TCP/IPv6)” option.
- Select “OK” to save.
Follow these steps to turn off the IPv6 protocol in the Windows 11 Settings app:
- Navigate to the “Settings” menu.
- Select “Network & Internet.”
- Select “Advanced network settings” from the drop-down menu.
- Click the “More network adapter options” under the “Related settings” section.
- Right-click the network adapter and select “Properties.”
- Check the “Internet Protocol Version 6 (TCP/IPv6)” option.
Select “OK” to save.

How to enable or disable IPv6 on Windows 10?
To enable IPv6 on Windows 10, follow the steps below:
- Right-click on the Network / Wi-Fi symbol in the bottom-right corner of your screen.
- Navigate to “Network Settings”.
- Then, select “Open Network and Sharing Center”.
- Change adapter options are in the “Network and Sharing Center” window.
- The list of network adapters available on your machine will then appear.
- Select “Properties” from the menu of your active network adapter (Ethernet or Wi-Fi).
- Scroll down in the “Properties” pane until you see “Internet Protocol Version 6 (TCP/IPv6)”.
- Check the “Internet Protocol Version 6 (TCP/IPv6)” checkbox and click OK.
To turn off IPv6 on Windows 10, go through the steps above, uncheck the Internet Protocol Version 6 (TCP/IPv6) checkbox, and click OK.

How to enable or disable IPv6 on Linux?
Turning IPv6 on or off on Linux will vary depending on whether you are running a Red Hat-based or Debian-based system.
If you’re running a Red Hat-based system, here’s how to turn off IPv6:
- Launch the terminal application.
- Switch to the root user.
- Enter the following commands:
sysctl -w net.ipv6.conf.all.disable_ipv6=1
sysctl -w net.ipv6.conf.default.disable_ipv6=1
sysctl -w net.ipv6.conf.tun0.disable_ipv6=1
To re-enable IPv6, use the following commands:
sysctl -w net.ipv6.conf.all.disable_ipv6=0
sysctl -w net.ipv6.conf.default.disable_ipv6=0
sysctl -w net.ipv6.conf.tun0.disable_ipv6=0
sysctl -p
If you’re running Debian, here’s how to disable IPv6 on Linux:
- Launch the terminal application.
- Enter the following command:
sudo nano /etc/sysctl.conf
- Add the following to the file:
net.ipv6.conf.all.disable_ipv6 = 1
net.ipv6.conf.default.disable_ipv6 = 1
net.ipv6.conf.lo.disable_ipv6 = 1
net.ipv6.conf.tun0.disable_ipv6 = 1
- Save and exit the file.
- Restart your computer.
Remove the above lines from /etc/sysctl.conf and reboot your device to re-enable IPv6.

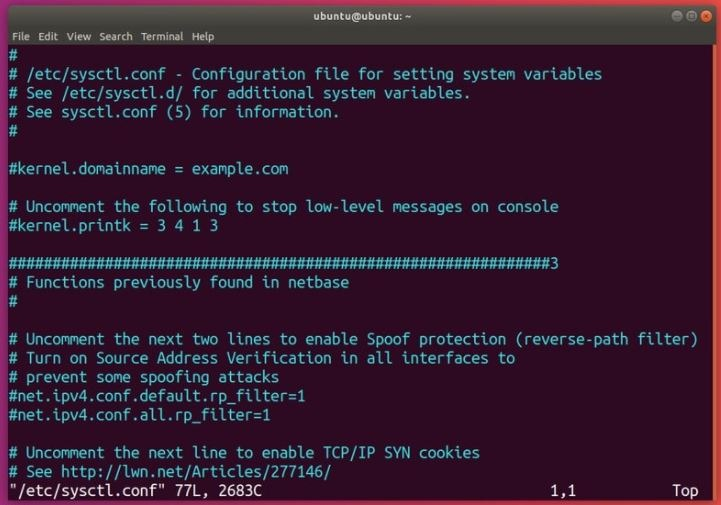
How to enable or disable IPv6 on Ubuntu?
To configure IPv6 on Ubuntu, you must first log in with root access to the server. After that, you must modify some of the information in the sysctl.conf file. To begin, open the file in editing mode.
Step 1: Open the sysctl.conf file and paste this at the end:
net.ipv6.conf.default.disable_ipv6 = 0
net.ipv6.conf.all.disable_ipv6 = 0
Step 2: Save and close the sysctl.conf file.
Step 3: The next file that needs to be edited is the interfaces file located at /etc/network/
Step 4: Paste the following line in the interfaces file:
iface eth0 inet6 static
pre-up modprobe ipv6
address IPv6-IP-Address
netmask 64
gateway IPv6-IP-Gateway-Address
Step 5: The interface file should then be saved. Remember to change IPv6-IP-Address and IPv6-IP-Gateway-Address with the Ubuntu IPv6 details you provided.
Step 6: To activate the Ubuntu IPv6 address on your server, reboot the networking service so the modifications take effect.
This section will now walk you through turning off the Ubuntu IPv6 protocol on your system. This is a more sophisticated guideline, so pay close attention to all aspects.
- Firstly, launch a terminal (CTRL+ALT+T).
- From here, you can disable IPv6 and check if it is enabled in the first place.
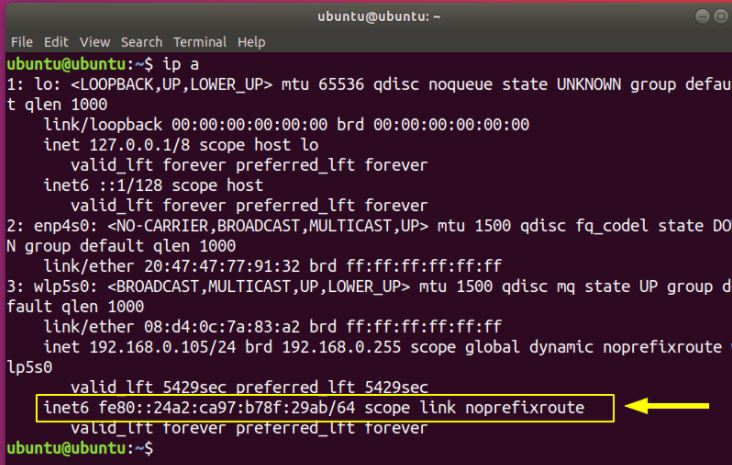
- You can check your IP address in Ubuntu using this command: ip a
If IPv6 is enabled, you will see something like this after performing the above command:

- To disable IPv6, enter this command into the sysctl file:
sudo sysctl -w net.ipv6.conf.all.disable_ipv6=1
sudo sysctl -w net.ipv6.conf.default.disable_ipv6=1
sudo sysctl -w net.ipv6.conf.lo.disable_ipv6=1 - You should also double-check that IPv6 is correctly disabled on Ubuntu. To do so, repeat the following command: ip a
You should not see any IPv6 entries, as you have disabled IV6 on your system.
Remember that following instructions will temporarily disable IPv6 on your Ubuntu operating system. In other words, your IPv6 will be activated again the next time your machine boots. You can make this change permanent by editing the sysctl.conf file.
You need to add the following lines to the file:
net.ipv6.conf.all.disable_ipv6=1
net.ipv6.conf.default.disable_ipv6=1
net.ipv6.conf.lo.disable_ipv6=1
To make the changes take effect, run the following command:
sudo sysctl -p
How to enable or disable IPv6 on Android?
To enable IPv6 on Android, follow these steps:
- Click “Settings,” then “Connections,” then “Mobile networks”.
- Navigate to “Access Point Names.”
- Choose a mobile network operator.
- Scroll to “APN protocol.”
- Choose “IPv6” from the menu.
To disable IPv6, do the following:
- Click “Settings,” then “Connections,” then “Mobile networks”.
- Navigate to “Access Point Names.”
- Choose a mobile network operator.
- Scroll to “APN protocol.”
- To disable IPv6, choose “IPv4” from the menu.
How to enable or disable ipv6 on iPhone?
Although Apple does not permit you to turn off IPv6 on your iPhone, there is a workaround.
- Navigate to Settings and tap the “i” next to your Wi-Fi SSID.
- Scroll down and tap “Configure DNS.”
- Switch to “Manual,” then delete your IPv6 DNS addresses.
Conclusion
That’s it! Now, you should be ready to enable or disable IPv6 on your device, no matter which operating system you use.


Hide your IP
With Urban Free VPN
Download Urban VPN for free and browse the web while hiding your IP address.
Free Download